ACE R/C Model are proud to distribute KR Agencies Control Line Timer/ Governors in Australia.
Each timer will need a switch either push button or slide type & require An programming.
We carry in stock the spare switches & program cards Available as a combo or individually
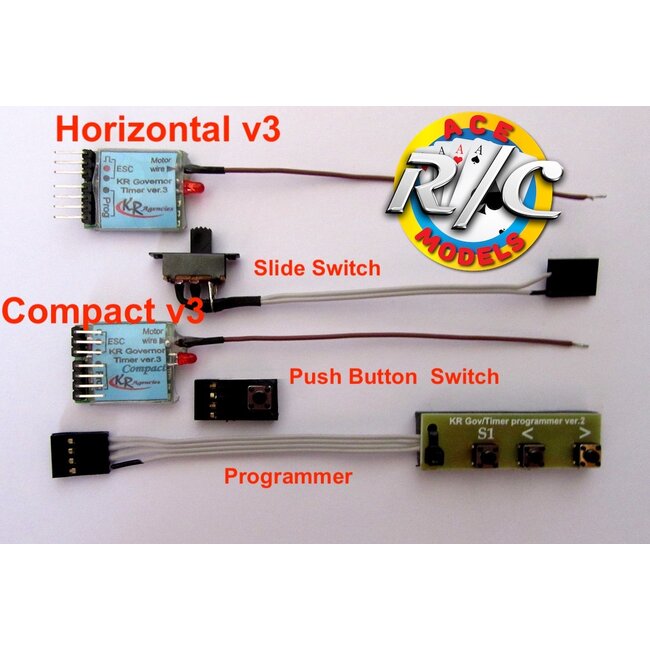
The KR Governor Timer V3 styles : Horizontal pin , Compact, Retract
Please read these instructions carefully!
This timer is designed for use with electric control-line stunt model aircraft, and has been
developed over many years of flight testing. I believe that it is unique in that it has the ability to
monitor the electric motor rpm accurately and use this information as a governor system to keep
the revs constant. It will work with the vast majority of inexpensive ESC’s (Electronic Speed
Controllers) that do not have a governor mode. If you do want to use the timer with an ESC that
does have a governor mode, then make sure that their governor mode is disabled, and also that the
SLOW OR ULTRA SLOW START IS DISABLED
For this timer to work, there is one extra wire that must be connected to any one of the ESC wires
that are connected to the motor. Please note that this timer will not operate without this wire
connected! Simply solder this wire (see Fig.1) to any one of the ESC motor wires behind the
tubular bullet connector, and use the supplied heat shrink tubing to insulate it.
Warning: Do not use the timer with ESC’s with a BEC voltage over 6.0 volts!
For the governor to work, you do need to a certain amount of reserve power available so that the
system can always add power if the rpm drops. In other words, if you run the motor at full
throttle, there will be nothing left to add as the battery voltage goes down.
Features:
Constant rpm on the majority of basic ESC’s
Variable governor that adds gain only when loaded.
RPM range from 4 500 to 16 000
3 choices now for the way that the motor stops when the flight time ends
Motor shuts down if the rpm drops too far below your set rpm. This is useful if the battery
voltage drops during the flight, or if the propeller is jammed for any reason while in governor
mode.
Installation:
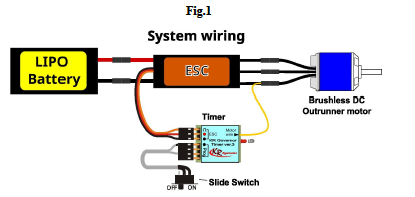
Fig.1 shows how the system is connected. Note that the timer has a 3-way pin connector marked
“ESC”, and a 4-way connector below it that is used for programming and also for the switch used
in flight. Make sure that you connect the two plugs correctly with the black (or brown)
ground wires next to each other as shown in Fig 2. This is important! If you put the plug
from the ESC in the wrong place or upside down, you will damage the timer processor.
Try this first: Some ESC’s require calibration of the throttle range from high to low before
using the ESC. This normally requires an R/C transmitter and receiver. The KR Timer/governor
system can do this by first switching ON the slide switch used for the flying mode, and then 1
connecting the battery. This outputs a full throttle signal to the ESC. Most of the ESC’s will beep
twice, after the two short beeps, switch the slide switch OFF. The throttle range for the ESC will
then be programmed. Please check the instructions for your ESC to ensure that this needs to be
done. This only needs to be done once.
Fig.2 (Flight mode)
Programming:
The KR Governor Timer comes pre-programmed with a medium/high rpm (this varies with each
motor and number of poles), a 25 second start-up delay, and 300 seconds or 5 minutes flight time.
The variable gain is set to 1. For the first test, I suggest that you simply adjust the rpm only. To
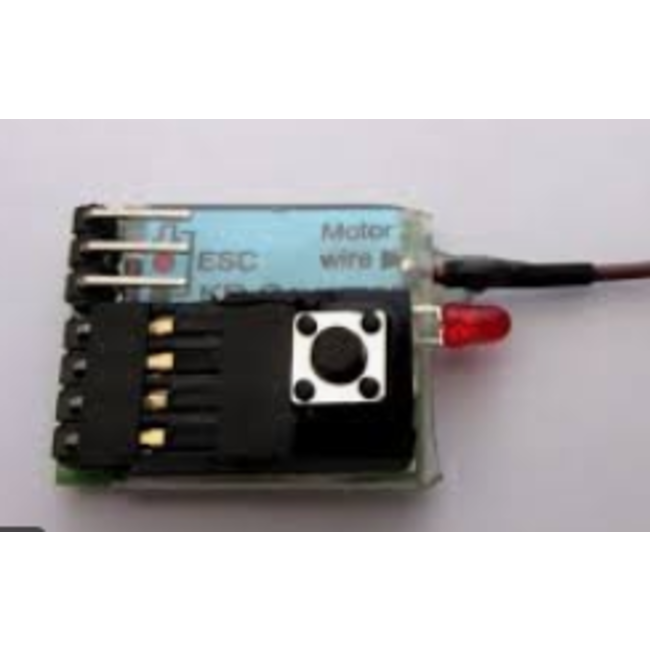
enter the programming mode, remove the slide switch and connect the programming card to the
timer’s 4-pin connector, and make sure that it is connected as shown in Fig. 3.
Fig. 3 (Program mode)
Now connect the battery. The picture shows the three push buttons labelled “S1”, “<” and “>”.
Press S1 momentarily to enter the program mode, and the LED on the timer board will light up.
The timer is now ready to program.
There are 5 settings for you to adjust:
Note: You can program any one of these setting individually. It is not necessary to go through a
specific order. Each program section is entered by simply pressing S1 the correct number of
times. The other 2 buttons marked “<” and “>” are only used for incrementing the rpm up
or down, and not for setting any time. The time and governor gain can only be set upwards. If
you get it wrong then let it time out (3 secs), and simply do it over again.
Set RPM
Press S1 twice quickly and release. The LED will flash twice and stay OFF to tell you that you
are in the Set RPM mode. The motor will start running up to the last set rpm, and will be in
governor mode. Use the “>” button to increase the rpm and the “<” button to decrease the rpm.
Each press and release will add or subtract approximately 50~100 rpm, depending on the number
of poles in the motor. You can also hold each button on to increment the rpm up or down.
Press S1 to store the rpm, the motor will stop, and the LED will go ON.
Set Flight Time
Press S1 three times quickly and release. The LED will flash 3 times and stay OFF. Now hold in
the S1 button and count the number of flashes from the LED. Each flash is 10 seconds. For
example, a 5 minute flight will be 30 flashes (30 x 10 = 300 seconds or 5 minutes) When you
release S1 for 3 seconds, then the flight time is automatically stored. The LED will flash 3 times
to indicate this.
Set Start-up delay time
Press S1 four times quickly and release. The LED will flash 4 times and stay OFF. Now hold in
the S1 button and count the number of flashes from the LED. Each flash is 1 second. If you
release S1 for 3 seconds, then the flight time is automatically stored. The LED will flash 4 times
to indicate this.
Set governor gain
Press S1 five times quickly and release. The LED will flash 5 times and stay OFF. Now hold in
the S1 button and count the number of flashes from the LED. Each flash adds 1 to the gain setting
to a maximum of 7. If you release S1 for 3 seconds, then the gain is automatically stored. The
LED will flash 5 times to indicate this. Disconnect the battery when the settings are right.
Set end procedure
There are now 3 choices for the way that the motor stops after the flight time.
Press S1 6 times quickly and release. The LED will flash 6 times and stay OFF. Now hold in the
S1 button and choose 1, 2, or 3 flashes from the LED. Release S1 for 3 seconds, then the end
procedure is automatically stored
Flying:
Make sure that the model is held securely by a helper until you are ready to fly and holding the
control handle. If taking off from thick grass then get your helper to hold the model until the
motor is up to its governed speed. If the prop gets jammed before this, then the motor shut down
feature will not operate. Disconnect the programming card if it is still connected. Connect the
slide switch and ESC connector as shown in Fig 2. Make sure that the switch is in the OFF
position and connect the battery. If the switch is in the ON position, the ESC will not start the
motor, because the timer will be producing a full throttle setting. To start the flight, switch the
slide switch to the ON position. To indicate that the flight process has started, the motor will run
slowly for about 2 seconds and stop. After the pre-set time (default delay is 25 seconds) the motor
will start and run for the flight time set by you. Note that the flying time starts from the time
3
that the motor starts running for the flight, and ends when the motor goes to the slower
speed for 2 seconds. This does not include the start-up delay time. You need to add the delay
time to get the total time from switch-on. Before the motor shuts down, the motor will give you
a warning by running about 25% slower for 2 seconds. After this, the motor will run at a slightly
faster rpm for 4 seconds to give you some extra speed for that perfect landing! You can enable the
brake in your ESC, as this will stop the rotating propeller and allow the model to glide further.
Your ESC manual will explain how to set the brake. The motor can be stopped at any time by
switching the slide switch OFF. Remember that a constant speed flight will get through the
pattern faster than an equivalent engine powered model with a 2/4 brake system. A time of 5 ó
minutes motor run time is usually enough for a complete AMA or FAI pattern.
Mounting the unit:
A good way to mount the unit is by simply using double-sided or mirror-tape. It only weighs
around 4 grams, so it’s not likely to come loose. I’ve also used Velcro, contact and silicone glues
with success.
Here below are the two options available. The standard timer with slide switch and the Compact
version with the pin connectors placed over the pc board with a detachable push button switch.
This is useful for small models as well as the bigger profile models. I also offer a version with an
extra connector for retracts.
Contact details:
If you have any questions or suggestions relating to this timer, then please contact me. My contact
details are below. Enjoy your E-Stunt!
Keith Renecle
KR Agencies
E-mail: [email protected]
DISCLAIMER: You use this device at your own risk. KR Agencies accepts no responsibility
for incorrect or irresponsible use of this device.
WARNING!! Model aircraft electric motors with propellers can be highly dangerous.
Although the delay timer should only start the motor after the preset time, DO NOT trust
this! Electronic gadgets can fail, so always stay clear of the propeller. Always use a helper to
hold your model when programming or when waiting for


")
/ hold-down retainer, front & rear (1 each)")
")